Spring Garden Checklist
Photos by Lisa Roper, ChanticleerAdvice from the pros on getting started this season, including taking photos

How you prepare your garden in spring sets the tone for the rest of the season, so it’s worth spending some time now planning for a lush and bountiful summer garden. Here are some ideas of how to tend your garden—from mulching to planting to dividing to planning—for the next year in the life of your home garden.
Beginning
While many experienced gardeners took advantage of the days of dry weather in March to begin cutting back dead foliage on perennials and grasses and raking out garden beds, April is also a fine month to begin these spring garden chores.
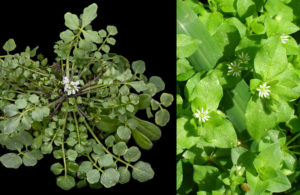
April is a good time to dig up winter annual weeds, such as shot-weed and chickweed. These irritating weeds germinate in the fall and persist over the winter, flowering as soon as the weather warms up. If these pests are left to flower, they’ll produce another round of seed, and the whole cycle begins again.
A useful tool for eliminating weeds is a weeding knife, which is versatile enough to be used for the planting and dividing that are also on the spring prep schedule.
Mulching
If you plan to mulch your garden beds, early spring is also the right time to do this. Plants have not yet emerged from the ground and your garden soil can be covered with mulch, being careful to avoid covering the crowns of emerging plants.
In Chanticleer’s Gravel Garden—a south-facing, well drained garden—I use a fine gravel mulch that gives a clean look and helps keep water away from the crown of the plants. Other common mulches used at Chanticleer that you may want to consider are composted leaf mold and woodchips, used for topdressing garden beds 2 to 4 inches. This type of barrier will suppress weeds and improve the organic content of the soil as it breaks down.
Planting
Success of a plant begins, to a great extent, at the time of planting. Timing and execution are important to keep in mind.
Begin planting your perennials and cool-season annuals in April. A key step is to water your plants well before you plant them. Then dig a hole twice as wide as the plant, add compost into the hole and mix it with the soil.
Examine the roots of your plant and tease them apart if they’re pot-bound. Place your plant in the hole so the crown of the plant is at or slightly above soil level. Use your hands to tamp down the soil around the plant, and water generously again.
Planting early in the season allows you to take advantage of spring rains and cooler temperatures. For the first month after planting, water twice a week if rain is sparse, and keep your eye on new plants through hot mid-Atlantic summers.
Dividing
Another spring gardening task is dividing your existing plants. For example, perennials and grasses that bloom in the summer and fall should be divided in early spring before the plants start actively growing.
There are a few reasons to divide your plants: you may want to increase the presence of a particular plant in your garden, the plant may have outgrown its original spot, or you may want to improve the health and vigor of a plant. And, when the center of a plant dies out, you know it’s time for dividing.
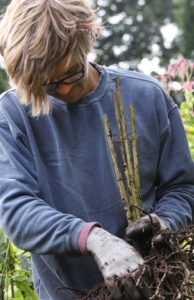
Dividing your plants is simple. Lift the plants gently with a gardening fork. Shake off the excess soil. Small fibrous rooted plants, like heuchera, can be gently teased apart by hand. But large fibrous rooted plants, like daylilies, take more effort. These are best separated with two gardening forks inserted back to back into the plant’s crown and then used as levers to pry the clump into two pieces.
Take care to remove any dead sections and to plant the new divisions as soon as possible. As with all new plantings, water them well to help them become established.
Planning with your camera
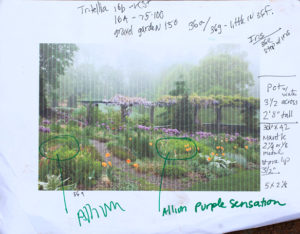
As bulbs and early-blooming perennials begin to flower, take notes of any changes you’d like to make for next year. Photography is a great tool for this.
Grab your camera and photograph the garden areas you want to adjust later. Print the images and mark up the page with notes on planting additions and changes. Having photos will be especially helpful in the fall—the time to plant new bulbs—because the garden looks totally different then and you may well have forgotten your ideas from the spring.
Taking notes—whether visual or written—through the entire season is the best way to improve your garden from year to year. Keeping details such as rainfall amounts can also be useful in understanding why the garden performed the way it did.
Photography is a particularly useful lens through which you can analyze your garden’s overall design. By converting color images to black and white, you’ll more easily see the contrast of form and texture in your garden.
Form and texture are critical to strong garden design because when flowers have finished blooming, contrast of these design elements adds visual vitality to your garden. Viewing the garden in black and white allows you to see more clearly what’s missing and what needs changing.
For example, you may notice from your photos that there are no vertical elements (tall plants) to contrast with low-growing, mounding shapes. Or your black and white photos may reveal that there’s plenty of fine textured foliage but not enough bold textures in your garden design as it currently exists.
By nature a garden is ever evolving, but by striving to refine the design, over time the garden can be transformed into a more successful space.
Chanticleer is a dynamic garden that’s ever changing. The staff welcomes guests to visit often, observe the garden through each season, and ask questions. To learn about classes and more, visit ChanticleerGarden.org. Chanticleer opened March 27th and remains open until November 3rd, Wed.–Sun., 10 to 5, and until 8 p.m. on Fri. from May through Labor Day. 786 Church Rd., Wayne.
Our Favorite Resources
- Aqua Terra Pools & Landscapes
- Archer & Buchanan
- Ball & Ball
- Berk Hathaway Country Properties
- Berk Hathaway Holly Gross
- Berk Hathaway M. Schwartz
- Compass Real Estate
- D.E. Duffey & Sons
- Dewson Construction
- DiSabatino Landscaping
- E.C.Trethewey
- Freedom Village
- Holland Floor Covering
- Keystone Gun-Krete
- King Construction
- The Kline Organization
- Latta-Kennedy Millworks
- Level Edge Construction
- Main Street Cabinet
- Martins Flooring
- McComsey Builders
- Monument/Sotheby’s Int’l
- Mostardi Nursery
- Mountaintop Construction
- Precise Buildings
- Rittenhouse Builders
- Precise Buildings
- Renewal Dynamics
- Sheller Energy
- Stable Hollow Construction
- White Horse Construction